API User Guide
Note
See the API Reference for Swagger documentation.
See our example API requests for every API operation.
The Fugue API enables you to interact with Fugue to programmatically access data relating to your tenant. It provides a powerful way to manage, monitor, and enforce your infrastructure.
What is the Fugue API?
The Fugue API is a RESTful API. Through the API Clients page (accessible from the Settings link at the top right of the UI), users can create a client and retrieve its unique Client ID and Client Secret. After authenticating, they can start sending API requests with their preferred tool to retrieve compliance results, kick off an on-demand scan or adjust a scan schedule, generate a new IAM policy for Fugue, and more.
The API Clients page also allows you to delete a client and regenerate or revoke a Client Secret. For more information, see Getting Started: Create Client ID and Secret.
API Functions
See the API Reference for a list of all supported Fugue API operations. You can find example curl requests for each operation in API Request Examples.
How to Use the API
Ready to begin? Below are general instructions for using the Fugue API and navigating the API Clients page.
Getting Started: Create Client ID and Secret
Note
Want a detailed tutorial for getting started with the API? See Hello World AWS, API (curl) if you’ll be using curl, or Hello World AWS, API (Postman) if you’ll be using Postman.
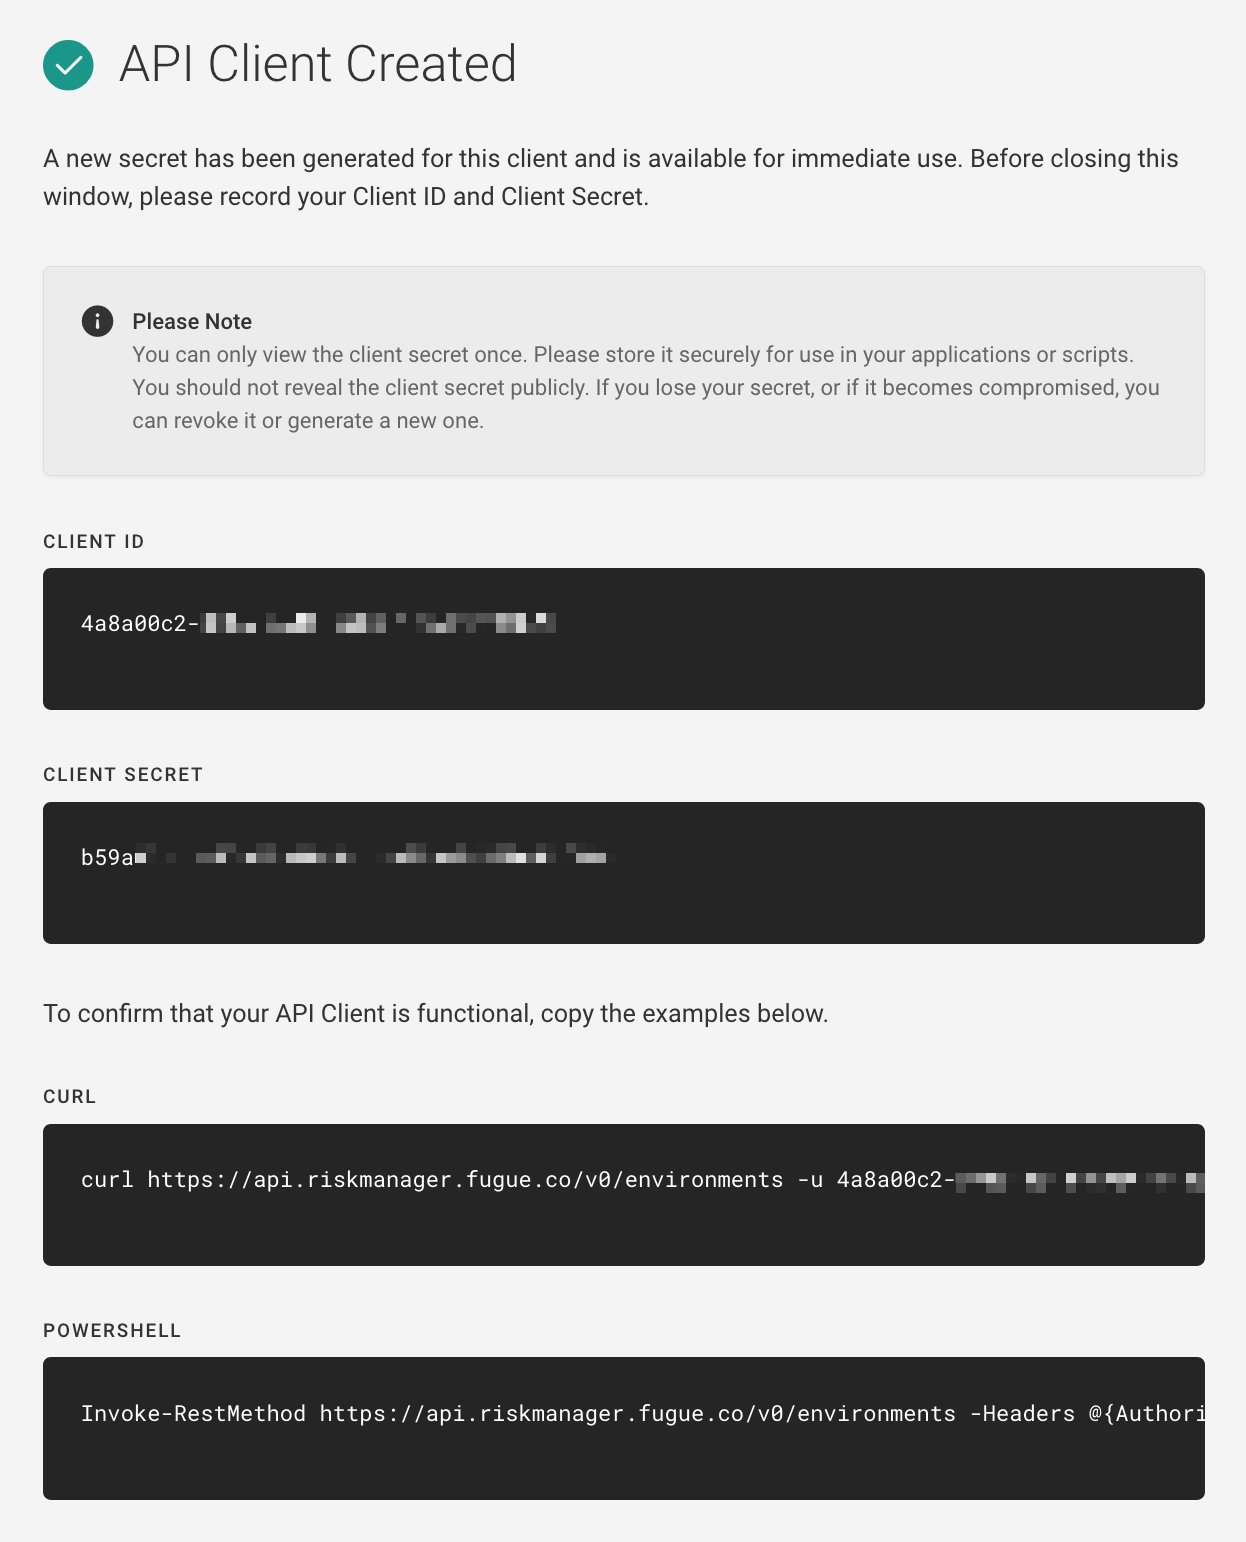
Before you can access the Fugue API, you need to create a client ID and client secret. A client ID and secret are essentially a username and password that allow your API client of choice to communicate with Fugue using Basic Authentication.
In the API Clients page (accessible from the Settings link at the top right of the UI), create a new API Client and give it a name.
2. Select the group(s) you want the API Client to belong to. For more information, refer to How to Create a Group.
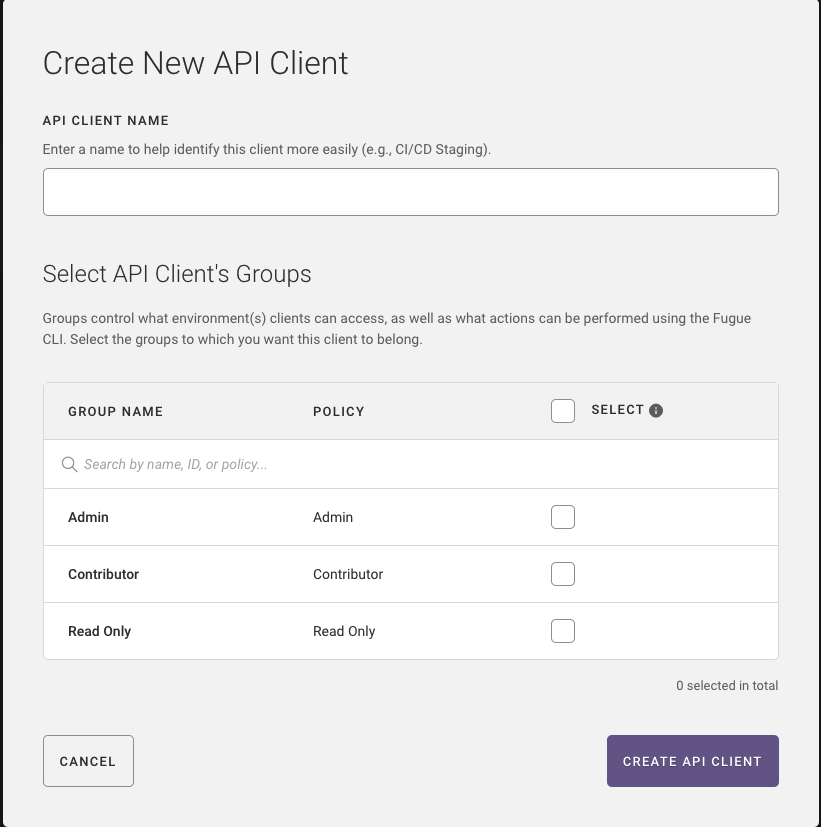
3. Click Create API Client.
4. Copy the Client ID and Client Secret and store it securely.
5. Use your preferred API tool to pass the Client ID and Secret in the Authorization HTTP header using Basic Auth.
6. Send an API request to the appropriate endpoint including any required parameters.
API tools, authentication, and API requests are discussed in more detail later in this guide.
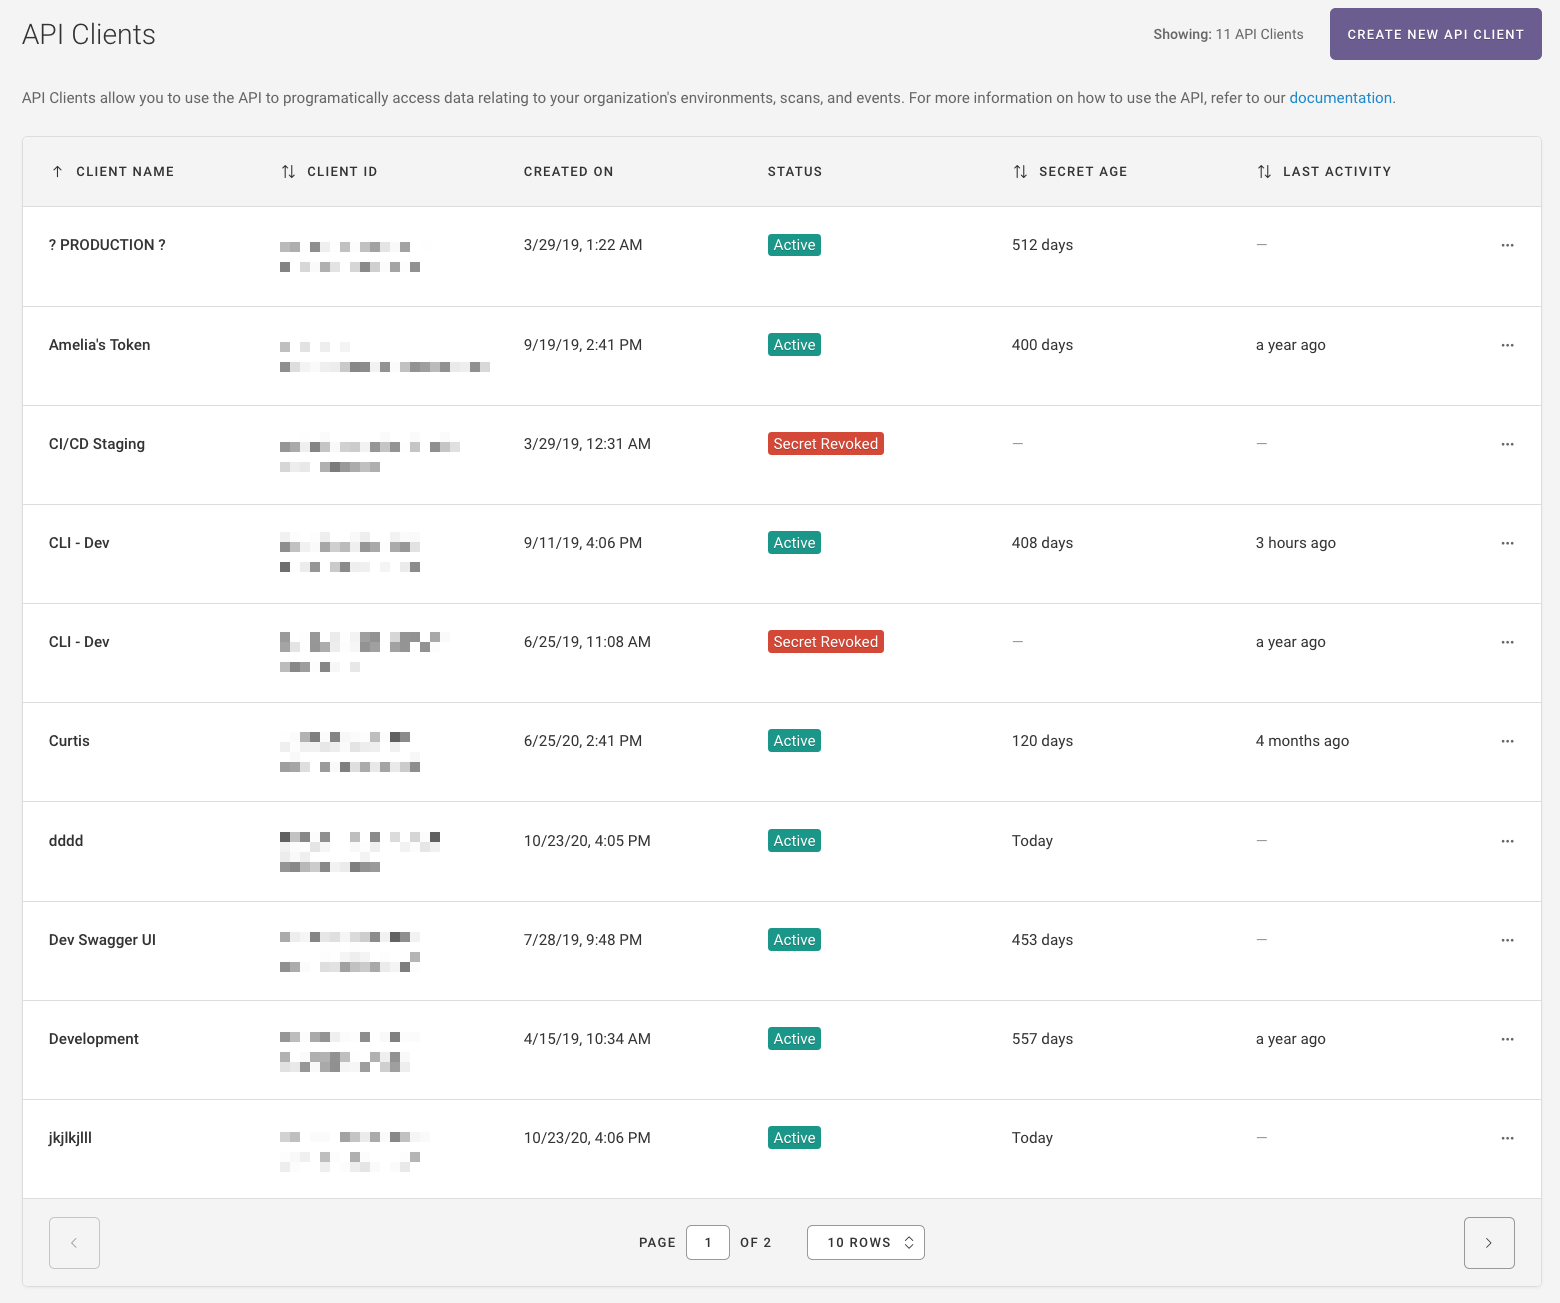
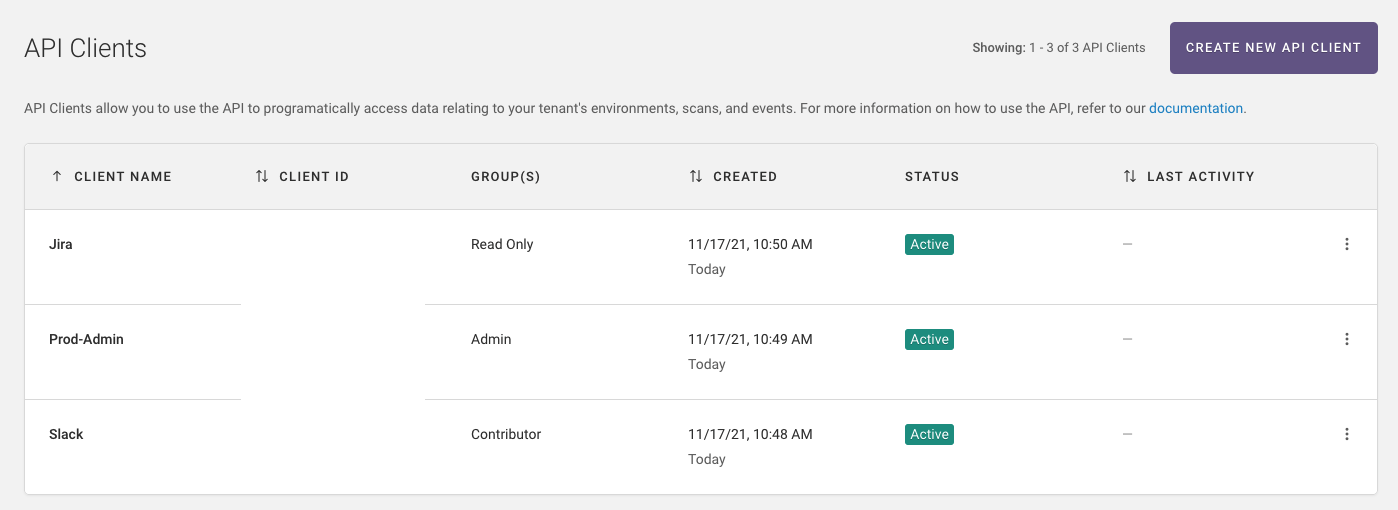
Understanding the API Clients Page
The API Clients page displays:
Client Name: Name of the API client.
Client ID: Unique ID of the client.
Groups: The RBAC group(s) associated with the client.
Created Date & Secret Age: When the client was created and length of time client secret has been active.
Status: Status of the client:
Active,Created, orSecret Revoked.Activeindicates a client has been created, its Client ID and Client Secret have been generated, and the client is ready for use with the API.Createdindicates a client has been created but a Client ID and Client Secret were not generated.Secret Revokedindicates a client has had its Client Secret revoked, preventing the client from communicating with the API.
Last Activity: When the client was last used
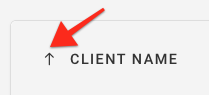
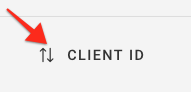
You can sort the table by the following categories in alphabetical or reverse alphabetical order:
Client name
Client ID
Created date and Secret age
Last activity
By default, clients are sorted by name in alphabetical order.
The active sorted category shows a single arrow. Select the arrow to reverse the direction.
The inactive category shows a double arrow. Select the double arrow to make it active.
If you have more than 10 clients, you’ll see a dropdown menu below the table of clients. You can choose to show 10, 20, 50, or 100 rows per page:

Editing Existing Clients
1. Navigate to API Clients page (accessible from the Settings link at the top right of the UI) and select the ellipsis ... next to the client you want to edit.
2. Optional. In API Client Name, enter a new name.
3. Select the group(s) you want the API Client to belong to. For more information, refer to How to Create a Group.
4. Click Update API Client.
Note
If you created an API Client before API Client Scoping was supported, edit your client to add a group for least privileged access.
Revoking or Regenerating a Secret
When you revoke a secret, any scripts or applications that use that secret will stop working. It may take up to 5 minutes to revoke the secret.
When you generate a new secret, Fugue will also revoke the previous secret. Any scripts or applications that use the previous secret will stop working until you update them with the newly generated secret. It may take up to 5 minutes to revoke the previous secret.
In the API Clients page, select the ellipsis
...next to the client you want to revoke and/or regenerate a secret for.
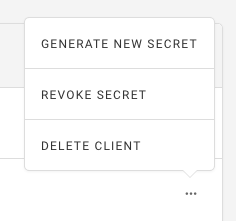
2. To revoke a secret, select Revoke Secret.
3. To regenerate a secret, select Generate New Secret.
Deleting an API Client
When you delete an API client, any scripts or applications that use an existing secret for that client will stop working. It may take up to 5 minutes to revoke the existing secret.
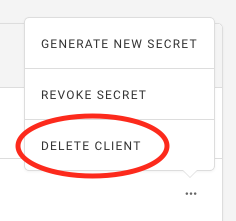
In the API Clients page, select the ellipsis
...next to the client you want to delete.Select
Delete Client.
OpenAPI 2.0 Spec
The API is defined in an OpenAPI 2.0 specification (formerly known as Swagger 2.0).
The specification file is located at https://api.riskmanager.fugue.co/v0/swagger. The human-readable documentation with examples is in the API Reference. Finally, for an interactive version of the Swagger spec, see the Swagger UI.
Swagger UI
Swagger UI offers an interactive way to view the Fugue API specification.
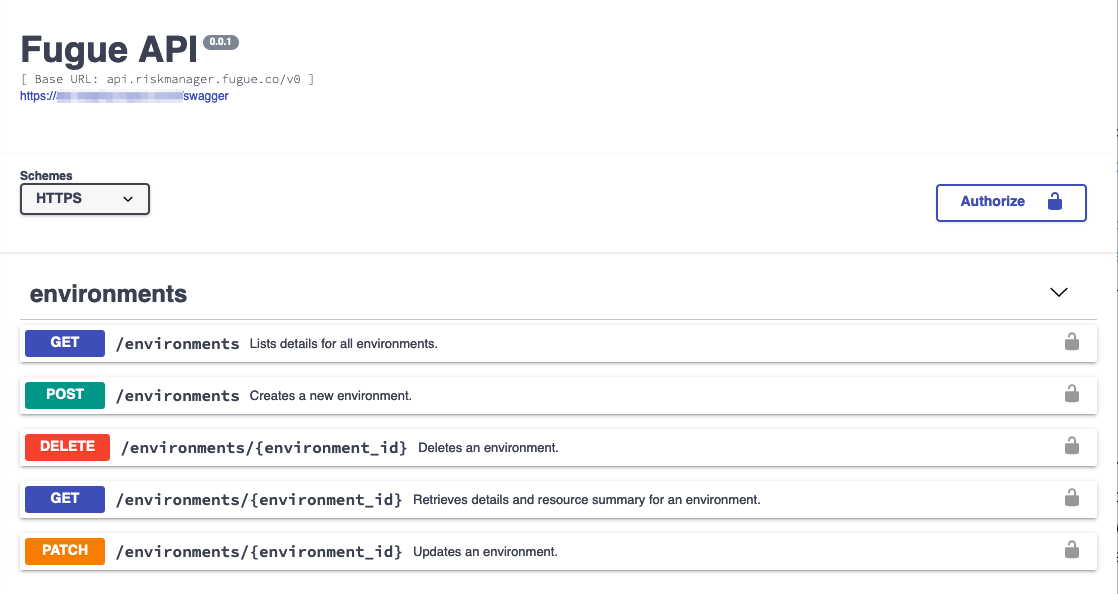
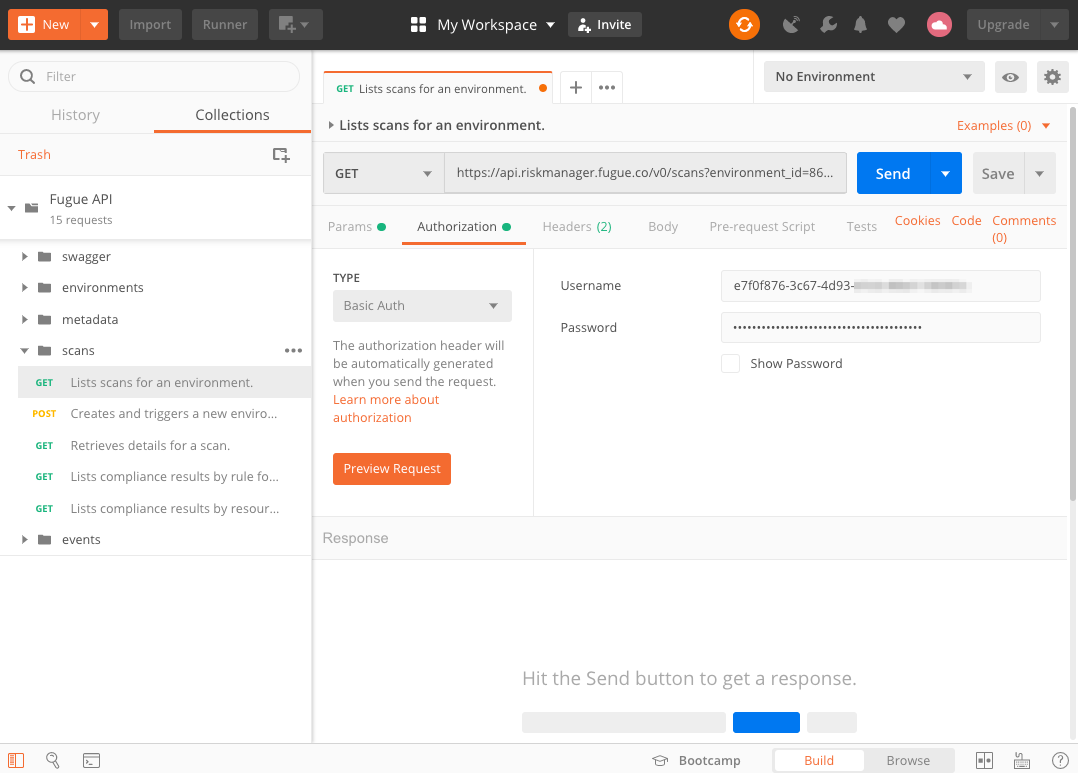
Swagger UI allows you to test out the Fugue API with simulated results when using it anonymously and live results when you authenticate with the API. You can log in by selecting the Authorize button and entering your Client ID and Client Secret.
Note
You must enter your Client ID and Client Secret to log in. Do not use your Fugue username and password.

Each API path features a Try it out button that allows you to interact with Fugue. You can adjust parameters and receive a simulated response if you haven’t provided authentication or a real response from the actual API if you have.
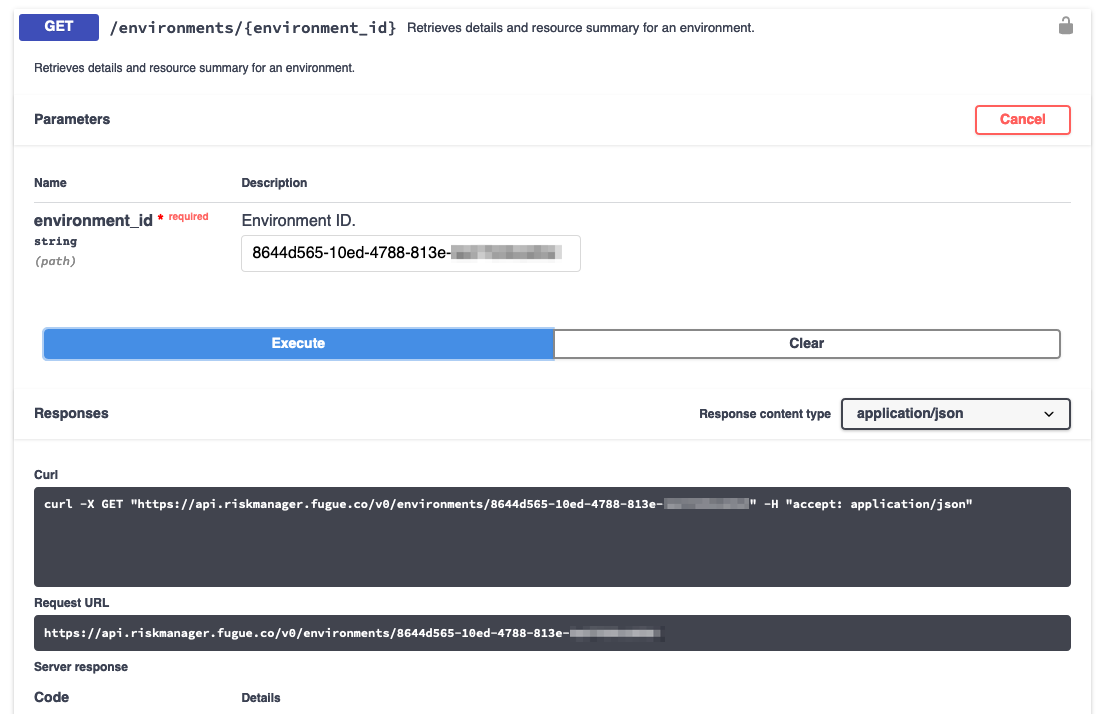
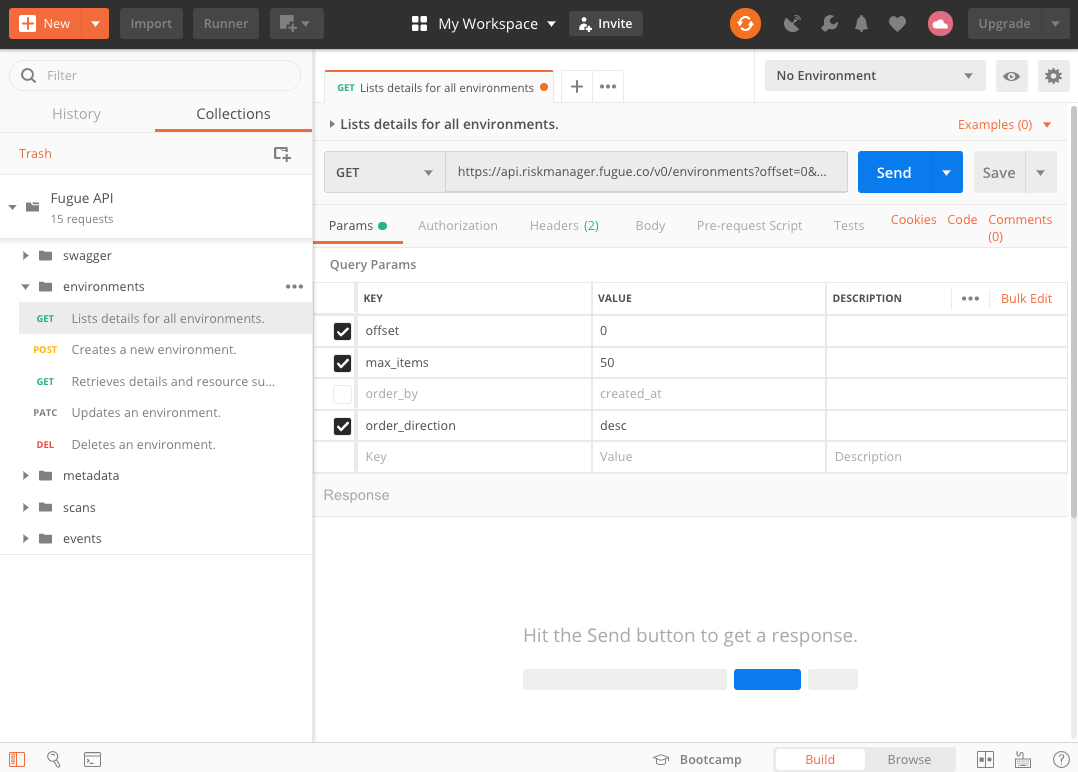
Either way, you’ll also get an automatically generated path and a curl command to send the API request. This request retrieves a list of details for all environments from the /environments endpoint:
curl -X GET \
"https://api.riskmanager.fugue.co/v0/environments" \
  -u $CLIENT_ID:$CLIENT_SECRET
Curl and API requests are discussed in more detail later in this guide.
For non-interactive but more detailed Swagger documentation, including examples, see the API Reference.
Generating Clients
Swagger Editor and Swagger Codegen are two tools that can generate a client for a specific programming language.
Swagger Editor is a web application for generating an SDK. First, you’ll need to import the Swagger specification file. In the editor’s File menu, select Import URL and paste the URL of the Swagger spec:
https://api.riskmanager.fugue.co/v0/swagger
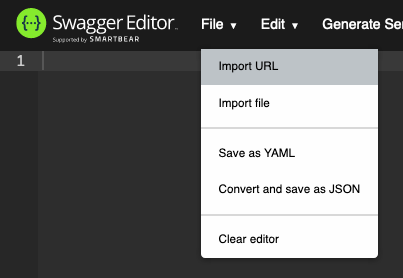
Alternatively, you can copy and paste the YAML from the Swagger spec.
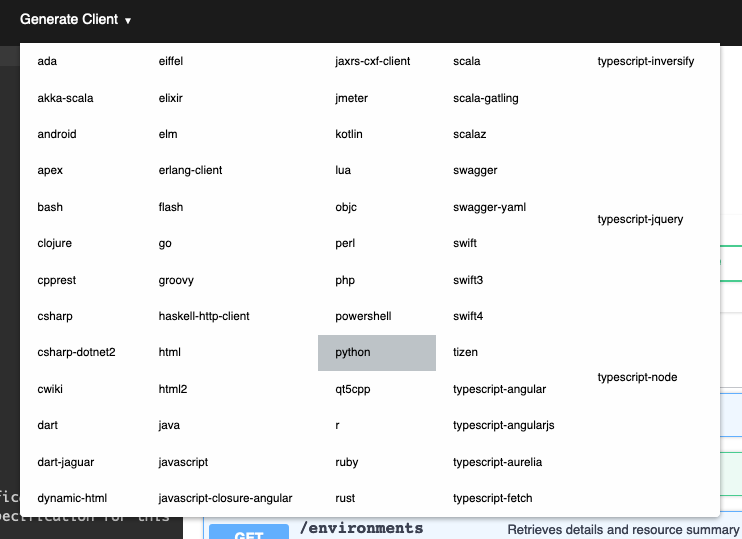
In the Generate Client menu, select the language you want to download an SDK for.
Swagger Codegen is a command-line tool that generates an SDK for a given language. You’ll find its documentation on Github.
If you’ve installed Swagger Codegen through Homebrew, generate a client with the following command, substituting ruby for the language of your
choice:
swagger-codegen generate -i https://api.riskmanager.fugue.co/v0/swagger -l ruby -o /tmp/test/
If you’ve installed Swagger Codegen from another source and are not using Windows, use the following command:
java -jar modules/swagger-codegen-cli/target/swagger-codegen-cli.jar generate \
   -i https://api.riskmanager.fugue.co/v0/swagger \
   -l ruby \
   -o /var/tmp/ruby_api_client
If you’re using Windows, use the following command:
java -jar modules\swagger-codegen-cli\target\swagger-codegen-cli.jar generate -i https://api.riskmanager.fugue.co/v0/swagger -l ruby -o c:\temp\ruby_api_client
You can find a list of supported languages by executing swagger-codegen (Homebrew version) or java -jar swagger-codegen-cli-2.2.1.jar (other versions).
Authentication
When Fugue creates an API client for an environment, it also generates a Client ID and Client Secret. These values are used to ensure secure communication with Fugue, and they must be passed to the API in the Authorization HTTP header using Basic Authentication.
An API client can access data across all the environments in your tenant within Fugue. However, it’s a best practice to create one client for each API use case, giving them a clear name that describes their purpose. This makes rotating generated Client Secrets easier since each application/script can be located easily and updated individually.
Warning
When Fugue creates the client, you may only view the Client Secret once. Store it securely for use in your applications or scripts. You should not reveal the Client Secret publicly. If you lose your secret, or if it becomes compromised, you can revoke it or generate a new one on the [API page](https://riskmanager.fugue.co/settings/api).
Making API Requests
Paths
To interact with the Fugue API, you send a request over HTTP to a specific API path. This is an example path for listing details for all environments in ascending order:
https://api.riskmanager.fugue.co/v0/environments?order_direction=asc
The path above incorporates the following components:
Base URL:
api.riskmanager.fugue.co/v0Endpoint:
/environmentsQuery parameter:
order_direction
The path is combined with an HTTP method such as GET, POST, PATCH, or DELETE to form the API request. For example, the operation above uses GET.
Query, Path, and Request Body Parameters
To determine what query, path, or request body parameters you’ll need for a request, check the API Reference, which also includes a complete list of endpoints. For information on formatting parameters, see Parameter Formatting.
Query Parameters, Single and Multiple
Some endpoints have query parameters, which are listed underneath the endpoint’s Request Parameters list in the API Reference.
Query parameters appear in the query string of an endpoint, after the ?, as demonstrated in the example below:
https://api.riskmanager.fugue.co/v0/environments?order_direction=asc
order_direction is a query parameter specifying what order the API response should appear in – in this case, asc (ascending).
To include multiple query parameters, just add an ampersand (&) and the new parameter name and value at the end of the query string. The first query parameter of an endpoint should always have a question mark (?) in front of it, but subsequent query parameters don’t need it. For example, the endpoint below looks at a particular environment (?environment_id=8f14f5db-9d05-421c-8a6b-0000000000) to return a maximum of 50 (&max_items=50) compliance events (&event_type=COMPLIANCE):
https://api.riskmanager.fugue.co/v0/events?environment_id=8f14f5db-9d05-421c-8a6b-0000000000&max_items=50&event_type=COMPLIANCE
If you want to include multiple values for the same query parameter – say, to return compliance and drift events for an environment –you can add an ampersand (&) and repeat the query parameter with the new value. For example, the query string below specifies event_type twice with different values, like so: &event_type=COMPLIANCE&event_type=DRIFT. As in the previous example, the first query parameter (environment_id) follows a question mark:
https://api.riskmanager.fugue.co/v0/events?environment_id=8f14f5db-9d05-421c-8a6b-0000000000&event_type=COMPLIANCE&event_type=DRIFT
For query parameter formatting, see Parameter Formatting.
Path Parameters
Some endpoints have path parameters, denoted by curly braces in the API Reference. In these cases, replace the {variable} with your own information, without the curly braces. For example, this path is for listing AWS Identity & Access Management (IAM) permissions needed to scan and enforce given resources:
https://api.riskmanager.fugue.co/v0/metadata/{provider}/permissions
Above, you can substitute {provider} with aws to specify AWS for standard regions or aws_govcloud for AWS GovCloud regions.
For path parameter formatting, see Parameter Formatting.
Request Bodies
Some API requests require a body. For example, if you’re using POST /environments to create an environment, your body might look like this:
{
  "compliance_families": [
    "CIS-AWS_v1.2.0", "GDPR_v2016", "HIPAA_v2013"
  ],
  "name": "API Test",
  "provider": "aws",
  "provider_options": {
    "aws": {
      "regions": [
          "us-east-1"
      ],
      "role_arn": "arn:aws:iam::XXXXXXXXXXXX:role/ FugueRiskManager"
    }
  },
  "scan_interval": 3600,
  "scan_schedule_enabled": "true",
  "survey_resource_types": [
    "AWS.S3.Bucket", "AWS.EC2.Vpc"
  ]
}
Each field above represents a body parameter. See the API Reference to determine which body parameters you’ll need for your request. For body parameter formatting, see Parameter Formatting.
The way to send the body in an API call will depend on what tool you’re using. Here’s an example in curl and an example in Postman.
Environment and Scan IDs as Parameters
For {environment_id} and {scan_id} query, path, or response body parameters, you’ll have to look up the actual IDs.
You can find the environment ID by navigating to your environment within the Fugue UI, then copying the 36-character identifier in the URL (e.g., ffc3aac1-9338-4965-ae30-3a8611111111).
Alternatively, you can retrieve it through the API itself by sending a GET /environments request to retrieve a list of your environments. Here’s the path:
https://api.riskmanager.fugue.co/v0/environments
And here’s the full API request, using curl:
curl -X GET \
"https://api.riskmanager.fugue.co/v0/environments" \
  -u $CLIENT_ID:$CLIENT_SECRET
In the response, look for the id field in each listed environment to locate the ID you need:
{
 "count": 1,
 "is_truncated": false,
 "items": [
   {
     "baseline_id": null,
     "compliance_families": [
       "CIS-AWS_v1.2.0",
       "PCI-DSS_v3.2.1"
     ],
     "drift": false,
     "id": "8644d565-10ed-4788-813e-6e5700000000",
     ...
   }
 ]
}
To determine the ID of a particular scan, you can also retrieve it through the API by sending a GET /scans?environment_id={environment_id} request, which returns a list of every scan in the given environment along with scan IDs. The path might look like this:
https://api.riskmanager.fugue.co/v0/scans?environment_id=ffc3aac1-9338-4965-ae30-3a8611111111
And the full API request might look like this, using curl:
curl -X GET \
"https://api.riskmanager.fugue.co/v0/scans?environment_id=ffc3aac1-9338-4965-ae30-3a8611111111" \
  -u $CLIENT_ID:$CLIENT_SECRET
Just like with the environment ID, look for the id field in each listed scan of the response to locate the scan ID you need:
{
  "count": 16,
  "is_truncated": false,
    "items": [
    {
      "created_at": 1553747169,
      "environment_id": "ffc3aac1-9338-4965-ae30-3a8611111111",
      "finished_at": 1553747373,
      "id": "8576a1b3-2f72-4e1d-902a-c81f22222222",
      "message": null,
      "remediation_error": false,
      "status": "SUCCESS",
      "updated_at": 1553747373
    }
  ]
}
Parameter Formatting
To learn how to format query, path, and request body parameters, or to understand response formatting, see Compliance Standards, Resource Types, Time and Date, AWS Regions, and Providers below. To learn how to find environment and scan IDs, see Environment and Scan IDs.
Compliance Families
Some operations require you to specify one or more compliance families in a query or request body parameter. Here are a few examples:
Listing compliance results by control for a scan:
GET /scans/{scan_id}/compliance_by_rulesListing compliance results by resource type for a scan:
GET /scans/{scan_id}/compliance_by_resource_typesCreating an environment:
POST /environmentsUpdating an environment:
PATCH /environments/{environment_id}
See the desired operation in the API Reference for a list of compliance families and how they’re formatted. For instance, if you want to list compliance results by control for a scan, you’d refer to the family entry in the Query Parameters heading and see that CIS AWS v1.3.0 is formatted as "CIS-AWS_v1.3.0"
You can specify the family query parameter multiple times in the query endpoints to retrieve multiple families. For example, you can use the HTTP GET method with the following endpoint to filter compliance results by the CIS AWS (v1.3.0) and GDPR (v2016) compliance families:
GET /scans/{scan_id}/compliance_by_rules?family=CIS-AWS_v1.3.0&family=GDPR_v2016
Note that the name of the query parameter or request body parameter (family, compliance_families, etc.) varies from operation to operation, but the families themselves are always formatted the same way. For instance, CIS AWS v1.3.0 is always formatted CIS-AWS_v1.3.0 no matter what you’re doing with the API.
Resource Types
To see a list of all supported resource types for a cloud provider, with each resource name formatted the way the API expects it, see our service coverage pages for AWS & AWS GovCloud, Azure & Azure Government, and Google.
Note that resource types in request body parameters must be surrounded by double quotes, like "AWS.EC2.Vpc" or "AWS.S3.Bucket". You can specify the resource type multiple times in the body to retrieve multiple standards. For example, if you’re using POST /environments to create an environment and scan only "AWS.EC2.Vpc" and "AWS.S3.Bucket" resources, your body might look like this:
{
  "compliance_families": [],
  "name": "API Example",
  "provider": "aws",
  "provider_options": {
    "aws": {
      "regions": [
          "us-east-1"
      ],
      "role_arn": "arn:aws:iam::XXXXXXXXXXXX:role/FugueRiskManager"
    }
  },
  "survey_resource_types": [
    "AWS.EC2.Vpc", "AWS.S3.Bucket"
  ]
}
Resource types in query parameters should not use double quotes. You can specify the resource type multiple times in the query endpoints to retrieve multiple standards. For example, this request filters compliance results by AWS.EC2.Vpc and AWS.S3.Bucket resources:
https://api.riskmanager.fugue.co/v0/scans/{scan_id}/compliance_by_resource_types?resource_type=AWS.EC2.Vpc&resource_type=AWS.S3.Bucket
You can also retrieve the list through the API itself by sending a GET /metadata/{provider}/resource_types?region={region} request. The path might look like this, if you’re retrieving resource types supported in the us-gov-west-1 region of the provider aws_govcloud:
https://api.riskmanager.fugue.co/v0/metadata/aws_govcloud/resource_types?region=us-gov-west-1
The full API request might look like this, using curl:
curl -X GET \
"https://api.riskmanager.fugue.co/v0/metadata/aws_govcloud/resource_types?region=us-gov-west-1" \
  -u $CLIENT_ID:$CLIENT_SECRET
The response includes a list of all supported resources for that provider.
Note
When creating a rule for a Repository provider, or multiple providers of any type, the resource_type request body parameter must be set to DEFINED_IN_CODE and the resource type must be defined in the rule_text body parameter.
To learn more about specifying resource types in custom rules, including when to use the Fugue resource name vs. the Terraform resource name, see the Custom Rules Reference.
Time and Date
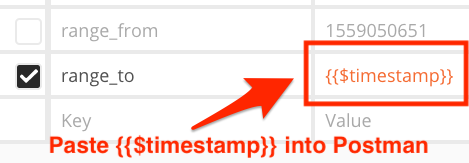
Timestamps in API requests and responses are formatted using Unix time (also called Epoch time), which looks like this: 1558964232. To convert a date and time to a Unix timestamp, or vice versa, you can use an online converter such as this one. If you’re using Postman and you want the current time automatically converted to Unix time, simply copy and paste the string {{$timestamp}} into the desired field, as shown below. Postman will convert {{$timestamp}} into Unix time automatically.
AWS Regions
Note
You can update regions for an environment with the API under specific conditions. See our note here.
When specifying AWS regions in the API, format the region according to the list below:
US East (N. Virginia) - us-east-1
US East (Ohio) - us-east-2
US West (N. California) - us-west-1
US West (Oregon) - us-west-2
Asia Pacific (Mumbai) - ap-south-1
Asia Pacific (Seoul) - ap-northeast-2
Asia Pacific (Singapore) - ap-southeast-1
Asia Pacific (Sydney) - ap-southeast-2
Asia Pacific (Tokyo) - ap-northeast-1
Canada (Central) - ca-central-1
EU (Frankfurt) - eu-central-1
EU (Ireland) - eu-west-1
EU (London) - eu-west-2
EU (Paris) - eu-west-3
EU (Milan) - eu-south-1 (beta)
EU (Stockholm) - eu-north-1
Middle East (Bahrain) - me-south-1 (beta)
South America (São Paulo) - sa-east-1
AWS GovCloud (US East) - us-gov-east-1
AWS GovCloud (US West) - us-gov-west-1
Alternatively, specify all regions by using an asterisk "*".
Note that regions in request body parameters must be surrounded by double quotes, like "us-east-1" or "us-gov-west-1".
For more information about regions in the API, see Specifying AWS Regions.
Providers
You’ll occasionally need to specify the provider as a query, path, or request body parameter:
For AWS environments, use
AWSFor AWS GovCloud environments, use
AWS_GOVCLOUDFor Azure and Azure Government environments, use
AZUREFor Google environments, use
GOOGLEFor repository environments, use
REPOSITORY
When specifying the provider in a request body for creating or updating custom rules, note that the provider field is deprecated. Use the providers field instead, which takes a list of strings.
Custom Rule Severity
Fugue accepts the following parameters for custom rule severity:
InformationalLowMediumHighCritical
Deep Dives
Baselines, Drift Detection, and Enforcement
The API allows you to update an environment to:
Set (enable/update) a baseline, which enables drift detection
Disable a baseline and drift detection
Enable baseline enforcement (AWS & AWS GovCloud only)
Disable baseline enforcement (AWS & AWS GovCloud only)
Enabling a baseline and updating a baseline are the same thing, to the API. In both cases, you set the baseline by sending an API request to update your environment with the scan ID you want to use as the baseline in the request body. The infrastructure configuration in that scan becomes the baseline. When you set a baseline, drift detection is also enabled.
Disabling a baseline is a similar process, except instead of providing a scan ID for the baseline, you replace it with an empty string. When you disable a baseline, drift detection is also disabled.
Enabling enforcement and disabling enforcement (AWS & AWS GovCloud only) also involve sending an API request to update your environment. The request body is the only difference, which sets remediation to true or false to enable or disable it.
API Path for Baseline, Drift Detection, and Enforcement Changes
Whether you’re enabling/disabling a baseline, drift detection, or enforcement, you’ll need to find your environment ID and update the environment by sending a request body to the following API path, replacing {environment_id} with your ID:
https://api.riskmanager.fugue.co/v0/environments/{environment_id}
Request Bodies for Baseline, Drift Detection, and Enforcement Changes
When you update an environment, the request body only needs to include the field(s) you want to modify. Anything that isn’t included isn’t changed. This means each example below can be used as a complete request body. However, if you want to change other environment settings at the same time, you can include them in the body as well. For example, you can also update the scan interval. For a full list of fields, see the API Reference.
Set a Baseline & Enable Drift Detection – Request Body
To set (enable/update) a baseline and enable drift detection, find the scan ID you want to use as a baseline and send the following request body to the API path, replacing {scan_id} with your ID. When you set a baseline, drift detection is also enabled.
{
  "baseline_id": "{scan_id}"
}
Because setting and updating a baseline are the same thing to the API, the request enables a baseline if it isn’t already enabled and sets it to the given scan ID.
Disable a Baseline & Drift Detection – Request Body
To disable a baseline and drift detection, send the following request body to the API path, which changes the scan ID to an empty string. When you disable a baseline, drift detection is also disabled.
{
  "baseline_id": ""
}
Enable Enforcement – Request Body (AWS & AWS GovCloud only)
To enable baseline enforcement, send the following request body to the API path:
{
  "remediation": true
}
Disable Enforcement – Request Body (AWS & AWS GovCloud only)
To disable baseline enforcement, send the following request body to the API path:
{
  "remediation": false
}
How to Set/Disable a Baseline & Drift Detection with curl
To set (enable/update) a baseline and enable drift detection with curl, find the scan ID you want to use as a baseline and the environment ID you want to update, then use the following command, replacing {environment_id} and {scan_id} with your IDs. The -d option contains the request body.
curl -X PATCH \
"https://api.riskmanager.fugue.co/v0/environments/{environment_id}" \
  -u $CLIENT_ID:$CLIENT_SECRET \
  -d '{
    "baseline_id": "{scan_id}"
}'
To disable the baseline and drift detection with curl, use the same command but set "baseline_id" to "" (empty string).
curl -X PATCH \
"https://api.riskmanager.fugue.co/v0/environments/{environment_id}" \
  -u $CLIENT_ID:$CLIENT_SECRET \
  -d '{
    "baseline_id": ""
}'
How to Enable/Disable Enforcement with curl (AWS & AWS GovCloud only)
To enable baseline enforcement with curl, find the environment ID you want to update, then use the following command, replacing {environment_id} with your ID. The -d option contains the request body.
curl -X PATCH \
"https://api.riskmanager.fugue.co/v0/environments/{environment_id}" \
  -u $CLIENT_ID:$CLIENT_SECRET \
  -d '{
    "remediation": true
}'
To disable baseline enforcement with curl, use the same command but set "remediation" to false.
curl -X PATCH \
"https://api.riskmanager.fugue.co/v0/environments/{environment_id}" \
  -u $CLIENT_ID:$CLIENT_SECRET \
  -d '{
    "remediation": false
}'
When your curl command successfully completes, the API returns a JSON document containing all of the details for your updated environment.
For more information about using curl, see API Tools.
More curl Examples
This example curl command sets the baseline to the scan ID f9c4fcbc-57e8-4e75-9bfb-b5aa03000000 for environment ID 8f12957b-9aec-40d2-9e4a-000000000000. When you set a baseline, drift detection is also enabled.
curl -X PATCH \
"https://api.riskmanager.fugue.co/v0/environments/8f12957b-9aec-40d2-9e4a-000000000000" \
  -u $CLIENT_ID:$CLIENT_SECRET \
  -d '{
    "baseline_id": "f9c4fcbc-57e8-4e75-9bfb-b5aa03000000"
}'
This curl command disables the baseline, drift detection, and enforcement for environment ID b671652f-35c1-4b5d-92ea-000000000000. When you disable a baseline, drift detection is also disabled.
curl -X PATCH \
"https://api.riskmanager.fugue.co/v0/environments/b671652f-35c1-4b5d-92ea-000000000000" \
  -u $CLIENT_ID:$CLIENT_SECRET \
  -d '{
    "baseline_id": "",
    "remediation": false
}'
When the curl command succeeds, the API returns a JSON document containing all of the details for your updated environment.
For more information about using curl, see API Tools.
Making Baseline Changes with Postman
Note
Before you take the following steps, you’ll need to import the Postman collection for the Fugue API. To learn how to get started with Postman, see Postman.
To make any baseline change with Postman, follow these steps:
1. First, find the environment ID you want to update.
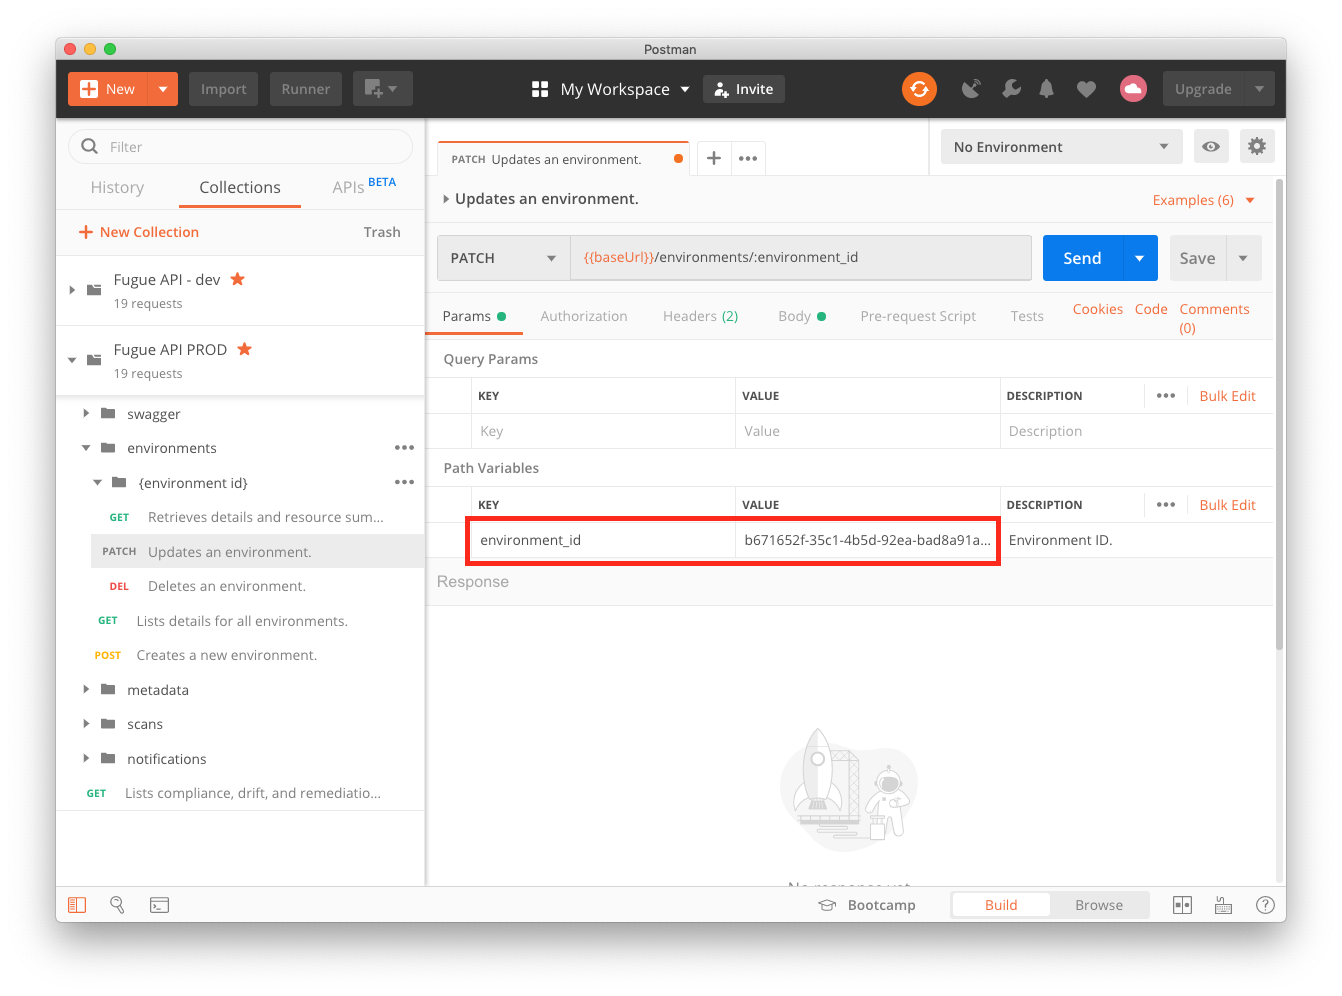
2. In Postman, select the PATCH - Updates an environment request from the Fugue API collection and paste your environment ID into the environment_id field:
3. Next, select the “Body” tab:
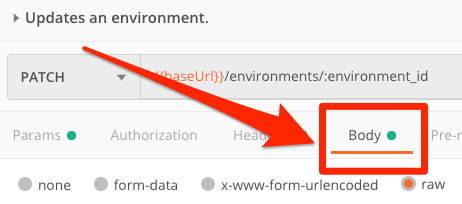
4. Enter the request body for the desired baseline change in the form below the “Body” tab. If you’re setting a baseline, you’ll need to find the scan ID you want to use as a baseline.
As an example, this request body disables the baseline:
{
  "baseline_id": ""
}
This example request body updates a baseline and enables drift detection by setting the baseline ID to 366cc170-1fec-426f-bf90-10cf00000000. It also enables enforcement:
{
  "baseline_id": "366cc170-1fec-426f-bf90-10cf00000000",
  "remediation": true
}
5. When you’re ready, hit the “Send” button, and when the request succeeds you’ll see a 200 OK status and a JSON document containing all of the details for your updated environment.
For more information about using Postman, see API Tools.
Updating a Scan Interval
The API allows you to change the scan interval for an environment by updating the environment. The default scan interval is 1 day and is specified in seconds, so the default value is 86400.
When Scan Interval Changes Take Effect
Scan interval changes take effect immediately, so the next scan occurs after the new interval. Say it’s noon and you change the scan interval from 12 hours to 1 hour. The next scan takes place 1 hour after you set the interval, at 1 p.m.
Likewise, if it’s noon and you change the interval from 12 hours to 1 day, the next scan occurs at noon the next day.
You can still manually trigger a scan at any time if you want your environment scanned sooner.
API Path for Changing the Scan Interval
The API path for changing the scan interval is the same API path for changing the baseline, drift detection, and enforcement. This is because the operations all require you to update fields in your environment.
To update the scan interval, you’ll need to find your environment ID and update the environment by sending a request body to the following API path, replacing {environment_id} with your ID:
https://api.riskmanager.fugue.co/v0/environments/{environment_id}
Request Body for Updating a Scan Interval
To update the scan interval, send the following request body to the API path, replacing {interval_in_seconds} with the desired length of time:
{
  "scan_interval": "{interval_in_seconds}"
}
When you update an environment, the request body only needs to include the field(s) you want to modify. Anything that isn’t included isn’t changed. This means the example above can be used as a complete request body. However, if you want to change other environment settings at the same time, you can include them in the body as well. For example, you can also make changes to baselines, drift detection, and enforcement. For a full list of fields, see the API Reference.
Updating the Scan Interval with curl
This example curl command updates the scan interval to 14,400 seconds (4 hours) for environment 8f12957b-9aec-40d2-9e4a-000000000000:
curl -X PATCH \
"https://api.riskmanager.fugue.co/v0/environments/8f12957b-9aec-40d2-9e4a-000000000000" \
  -u $CLIENT_ID:$CLIENT_SECRET \
  -d '{
    "scan_interval": "14400"
}'
When the curl command succeeds, the API returns a JSON document containing all of the details for your environment, including the updated scan interval.
For more information about using curl, see API Tools.
Updating the Scan Interval with Postman
Note
Before you take the following steps, you’ll need to import the Postman collection for the Fugue API. To learn how to get started with Postman, see Postman.
To update the scan interval using Postman, you’ll follow the same steps you would use to make baseline changes, but in Step 4, enter the scan interval request body into the form below the “Body” tab instead. As an example, this request body changes the scan interval to 4 hours (14,400 seconds):
{
  "scan_interval": "14400"
}
When you’re ready, hit the “Send” button, and when the request succeeds you’ll see a 200 OK status and a JSON document listing all of the details for your environment, including the updated scan interval.
For more information about using Postman, see API Tools.
Minimum, Maximum, and Recommended Intervals
The minimum scan interval you can specify is 600, or 10 minutes. There is no maximum scan interval, though we recommend scanning at least once per day to keep your environment up to date.
To determine the recommended scan interval for your specific environment, reach out to support@fugue.co. Once per hour, or every 3600 seconds, is a good rule of thumb.
When the Scan Interval Starts Ticking
The scan interval starts over when Fugue ends a scan. It also starts over when you update the scan interval.
Suppose you have a scan interval of 30 minutes and Fugue starts Scan 1 at 12:00. If Fugue finishes Scan 1 at 12:03, Fugue will start Scan 2 at 12:33, 30 minutes later.
Likewise, if it’s noon and you change the interval from 30 minutes to 1 hour, the next scan takes place 1 hour after you set the interval, at 1 p.m.
Initiating a Scan
The API allows you to manually initiate an environment scan whenever you like. To manually trigger a scan, you’ll need to send an API request to create a new scan.
Initiating a Scan with curl
To initiate a scan using curl, send a request to the following
path using the POST HTTP method, replacing {environment_id} with
your own environment ID:
https://api.riskmanager.fugue.co/v0/scans?environment_id={environment_id}
The full API request might look like this:
curl -X POST \
"https://api.riskmanager.fugue.co/v0/scans?environment_id=b671652f-35c1-4b5d-92ea-000000000000" \
  -u $CLIENT_ID:$CLIENT_SECRET
When the command successfully completes, the API returns a JSON document
with the scan ID, status IN_PROGRESS, and other details.
For more information about using curl, see API Tools.
Initiating a Scan with Postman
Note
Before you take the following steps, you’ll need to import the Postman collection for the Fugue API. To learn how to get started with Postman, see Postman.
To initiate a scan using Postman, send a request to the following path using the POST - Creates and triggers a new environment scan request from the Fugue API Postman collection, then paste your environment ID into the environment_id field:
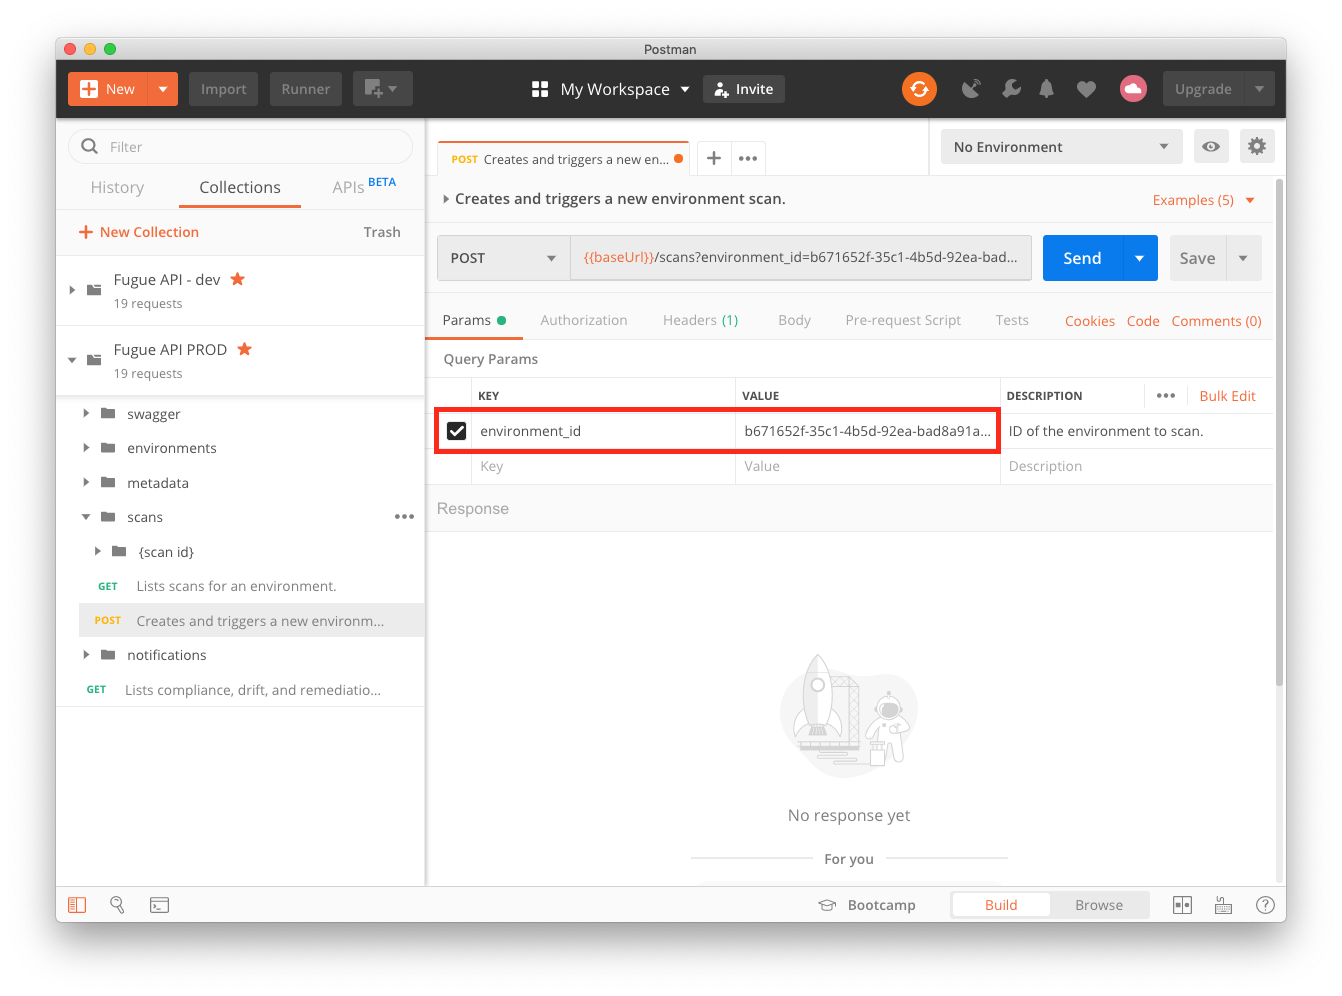
Then, hit the “Send” button, and when the request succeeds you’ll see a 201 Created status and a JSON document listing the scan ID, status IN_PROGRESS, and other details.
For more information about using Postman, see API Tools.
Specifying AWS Regions (Create/Update Environment)
When creating or updating (see note) an AWS or AWS GovCloud environment, use the regions parameter to list the regions you want your environment to include. You can specify a single region, multiple regions, or all regions (by using an asterisk, "*").
Note that only some environments can be updated to include different regions. See details.
See a list of regions, including how to format each.
Note
The region parameter is deprecated. Use the regions parameter instead.
Creating an Environment With Multiple Regions
This example request body creates an environment for all regions:
{
  "name": "AWS Prod",
  "provider": "aws",
  "provider_options": {
    "aws": {
      "regions": [
          "*"
      ],
      "role_arn": "arn:aws:iam::XXXXXXXXXXXX:role/FugueRiskManager"
    }
  },
  "compliance_families": [
    "SOC-2_v2017",
    "PCI-DSS_v3.2.1"
  ],
  "survey_resource_types": [
    "AWS.S3.Bucket"
  ]
}
This example creates an environment for us-east-1 and us-west-2:
{
  "name": "AWS Prod",
  "provider": "aws",
  "provider_options": {
    "aws": {
      "regions": [
          "us-east-1",
          "us-west-2"
      ],
      "role_arn": "arn:aws:iam::XXXXXXXXXXXX:role/FugueRiskManager"
    }
  },
  "compliance_families": [
    "SOC-2_v2017",
    "PCI-DSS_v3.2.1"
  ],
  "survey_resource_types": [
    "AWS.S3.Bucket"
  ]
}
Updating an Environment’s Regions
You may update the regions in an environment only if the environment was created after April 28, 2020 and has the regions parameter (not region). To see if your environment supports region updates, find your environment ID and send a GET request to /environments/{environment_id}, then check the output. If it shows the regions parameter, the environment supports region updates. If it shows the region parameter, the environment region cannot be changed.
There are three other important things to keep in mind when updating an environment’s region(s):
You can update an environment to include a single region, multiple regions, or all regions (by using an asterisk,
"*").If an environment is in an AWS standard region, it cannot be changed to an AWS GovCloud region, and vice versa.
When updating multiple regions, you need to include all members of the list in the request body. For example, if your environment is set up with
"us-east-1"and"us-east-2"and you want to add"us-west-1", you would include all three. The exception is if you’re updating to all regions, in which case you can simply specify"*".
Example - Checking If Regions Can Be Updated
Here’s an example curl request to see if an environment’s regions can be updated:
curl -X GET \
"https://api.riskmanager.fugue.co/v0/environments/b5d68e32-d44e-487e-a21c-123456789012" \
  -u $CLIENT_ID:$CLIENT_SECRET
And here’s an example response showing an environment that has the regions parameter and therefore can be updated:
{
    "id": "b7b47946-3773-4f26-1234-123412341234",
    "name": "Example All Regions",
    "provider": "aws",
    "tenant_id": "0c1d4192-aec7-414c-1212-121212121212",
    "provider_options": {
        "aws": {
            "regions": [
                "*"
            ],
            "role_arn": "arn:aws:iam::XXXXXXXXXXXX:role/Fugue1586369123"
        }
    },
    "compliance_families": [
    ...output trimmed for length...
    ]
}
Example - Updating Region
Here’s an example request body updating an AWS GovCloud environment’s regions to us-gov-west-1 and us-gov-east-1:
{
    "provider_options": {
        "aws_govcloud": {
            "regions": [
                "us-gov-west-1",
                "us-gov-east-1"
            ]
        }
    }
}
This request body changes an AWS environment to a single region, ca-central-1:
{
    "provider_options": {
        "aws": {
            "regions": [
                "ca-central-1"
            ]
        }
    }
}
Send the settings you want to update in the JSON request body. You can save the JSON in a file and attach it with the -d @{filename} option:
curl -X PATCH \
"https://api.riskmanager.fugue.co/v0/environments/b5d68e32-d44e-487e-a21c-123456789012" \
  -u $CLIENT_ID:$CLIENT_SECRET \
  -H "Content-Type: application/json" \
  -d @body.json
Specifying Azure Resource Groups (Create/Update Environment)
When creating or updating an Azure or Azure Government environment, use the survey_resource_groups parameter to list the resource groups you want Fugue to scan. You can specify a single resource group, multiple resource groups, or all resource groups (by using an asterisk, "*").
Note that when you use "*" to select all resource groups, Fugue will automatically detect new resource groups and add them to your environment. You can send another API request to update the environment and change back to a subset of resource groups at any time, at which point Fugue no longer automatically adds new resource groups to the environment (unless you select all resource groups with "*" again).
For more details, see How To: Add or Remove Azure Resource Groups.
API Tools
You can communicate with Fugue through your preferred API tool, such as curl or Postman.
curl
Curl is a command-line tool that can transfer data over HTTP and is frequently used to interact with APIs. Here’s an example of a curl command that requests the Fugue API to delete an environment:
curl -X DELETE \
"https://api.riskmanager.fugue.co/v0/environments/ffc3aac1-9338-4965-ae30-3a8611111111" \
  -u $CLIENT_ID:$CLIENT_SECRET
For requests that require a body, the easiest way to send it in curl is to paste the body into a JSON file and then use the -d data flag. For example, the following command requests the API to update an environment:
curl -X PATCH \
"https://api.riskmanager.fugue.co/v0/environments/{environment}" \
  -u $CLIENT_ID:$CLIENT_SECRET \
  -H "Content-Type: application/json" \
  -d @body.json
For more information, see the curl manual.
Postman
Postman is a popular GUI for interacting with APIs. A Postman collection contains a group of individual API requests that can be organized into folders.
Follow these steps to set up Postman with the Fugue API:
Once you’ve set up Postman, you can start sending API requests.
Postman also allows you to use variables in your requests. For example, you can use {{$timestamp}} to enter the current time as Unix time. For more information about Postman variables, see the Postman documentation.
Creating a Postman Collection (manual)
You can manually create a Fugue API collection in Postman by selecting the File menu, then Import....
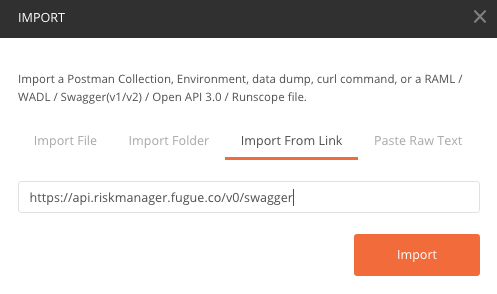
Next, select the Import From Link tab and paste the Swagger link:
https://api.riskmanager.fugue.co/v0/swagger
On the dialog box that pops up, ensure that only “Generate a Postman Collection” is selected:
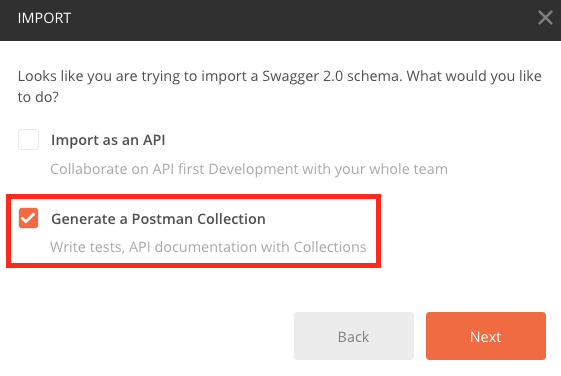
Postman will create a collection populated with all of Fugue’s endpoints. For more information about creating collections in Postman, see Postman’s documentation.
Note that you’ll need to repeat the import process whenever the Fugue API is updated. See the “Last Updated” date in the API Reference.
Before you can start using the collection, though, you need to configure authorization.
Configuring Authorization in Postman
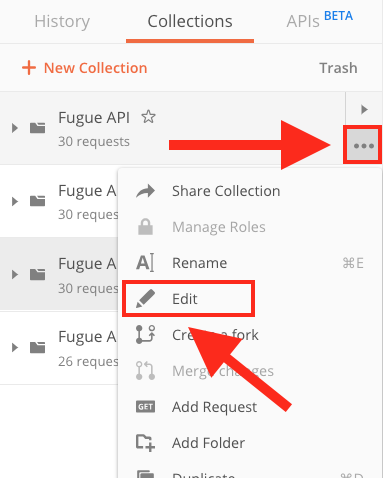
Configuring authorization at the Fugue API collection level allows each request in the collection to inherit your Client ID and Client Secret. In the Collections tab of the sidebar, select the ... button in the Fugue API collection and then select Edit.
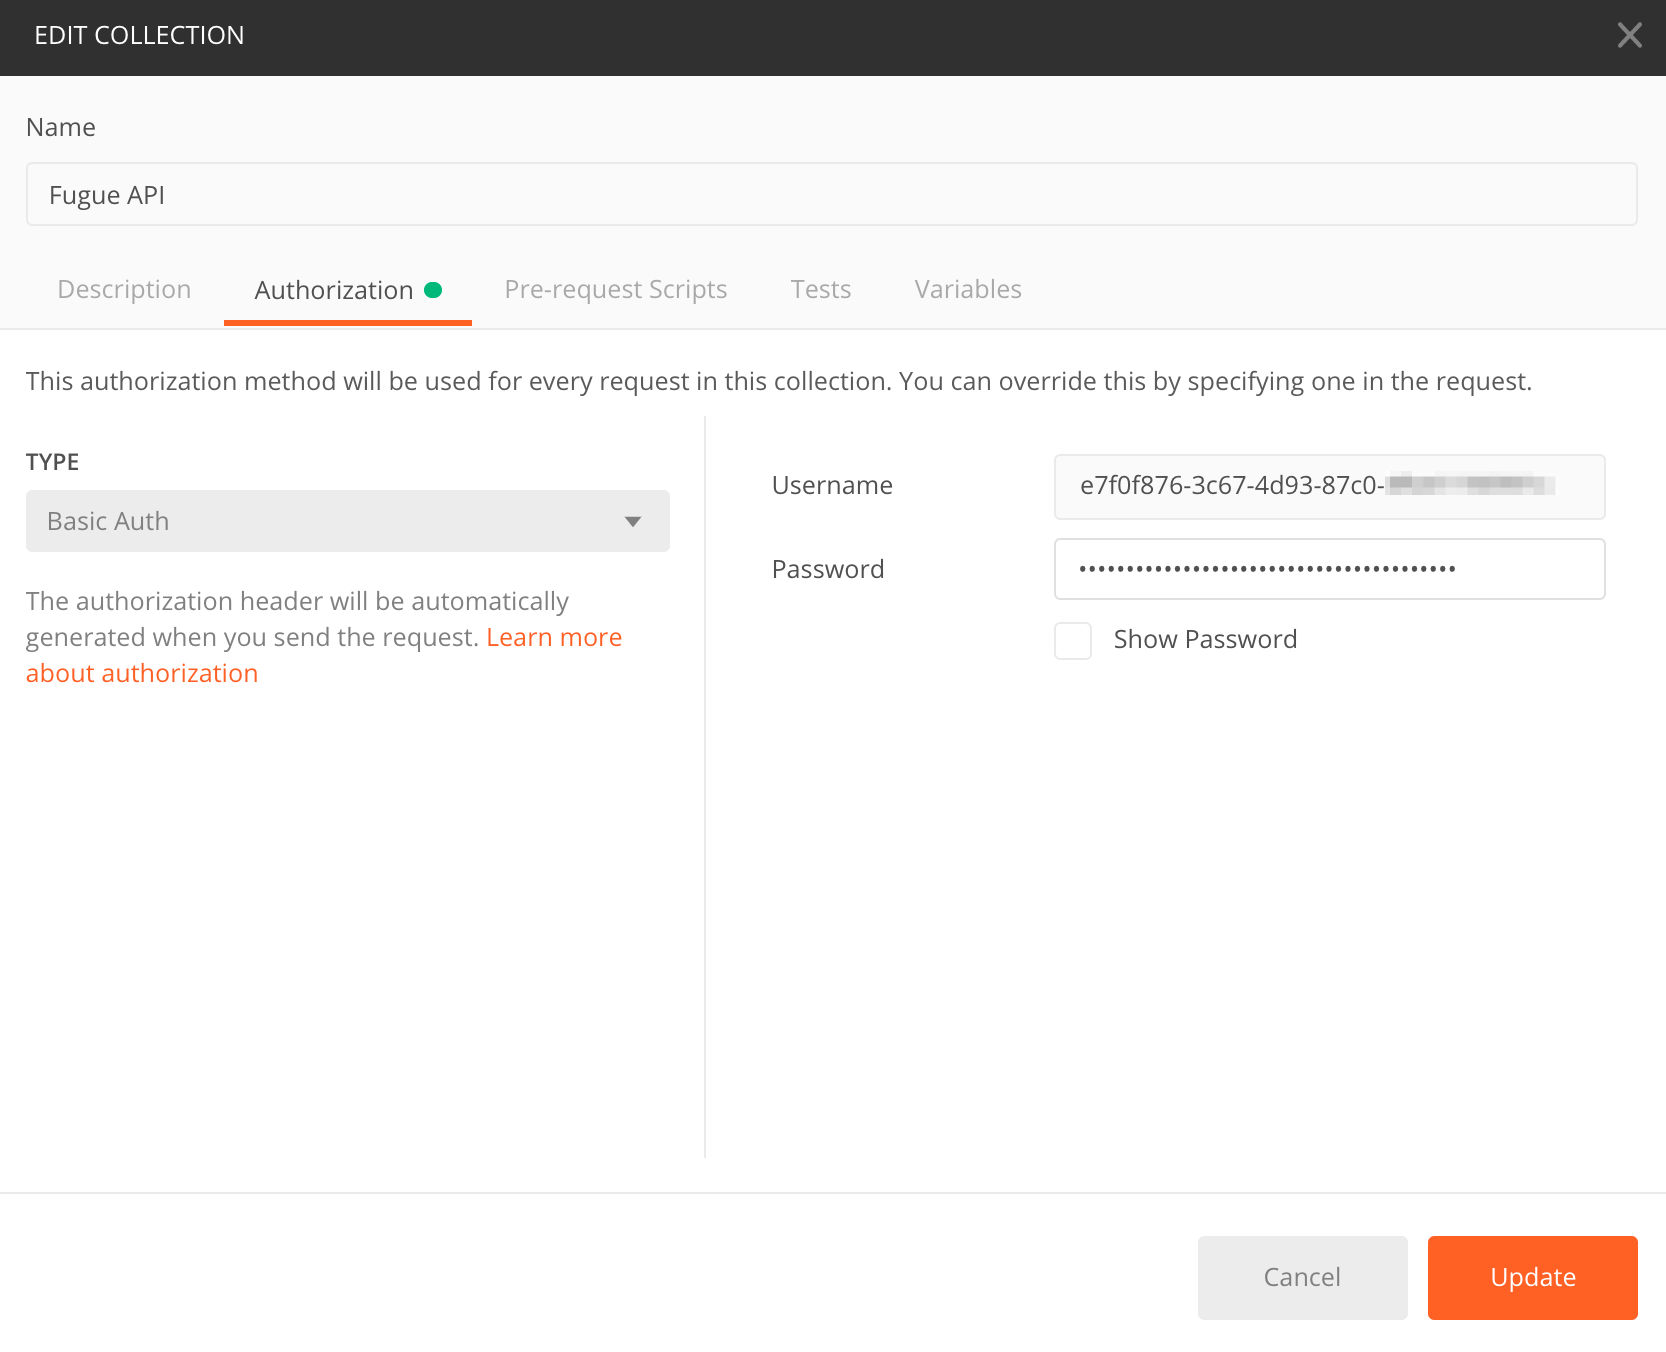
You’ll see an Edit Collection window. In the Authorization tab:
Set Type to Basic Auth.
Set Username to your Client ID.
Set Password to your Client Secret.
Select the
Updatebutton.
After you select Update, each request in the Fugue API collection will automatically inherit the authorization details.
Note
You may encounter a Postman quirk where a request does not automatically inherit authorization from the parent collection, in which case you’ll see this error message when you send the request:
{
    "type": "AuthenticationError",
    "code": 401,
    "message": "Invalid or missing authentication token"
}
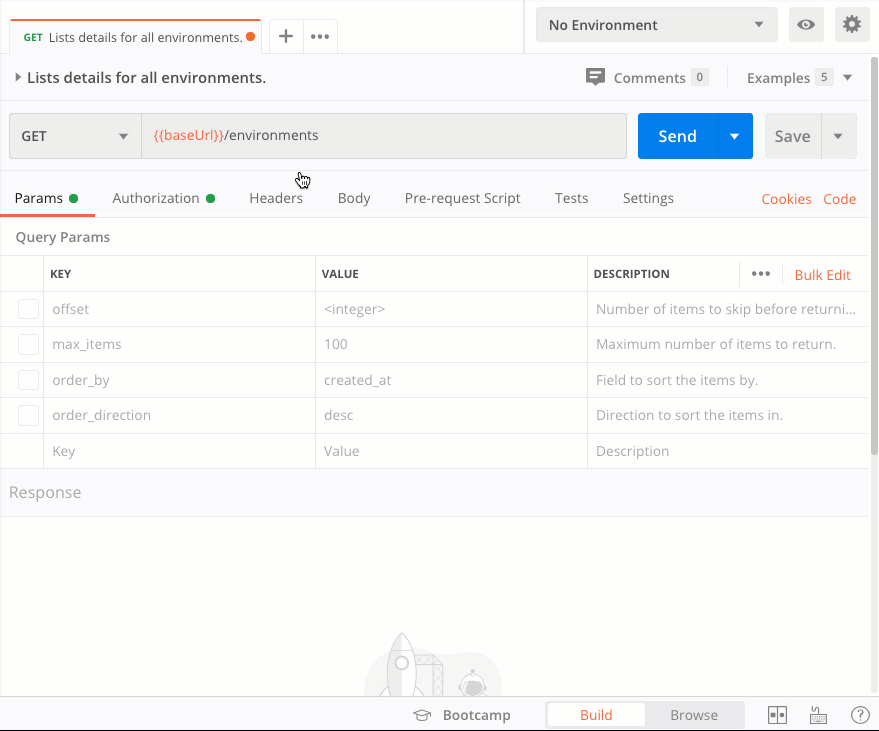
In this case, select the Authorization tab on the individual request and select “Inherit auth from parent” from the Type drop-down menu, then send your request again and select “Save”:
(To view the full-sized image, right-click and select View image)
You’ll need to do this once for every request in the collection.
Sending an API Request in Postman
To use Postman to send any API request, you can select the request from the Collections tab in the sidebar and enter the request query parameters and/or path parameters. You can also fill out the request body if required.
For example, to use Postman to delete an environment, select DEL Deletes an environment from the collection in the sidebar. Then, fill in the details:
In the Params tab:
Replace
{{environment_id}}with your environment ID.
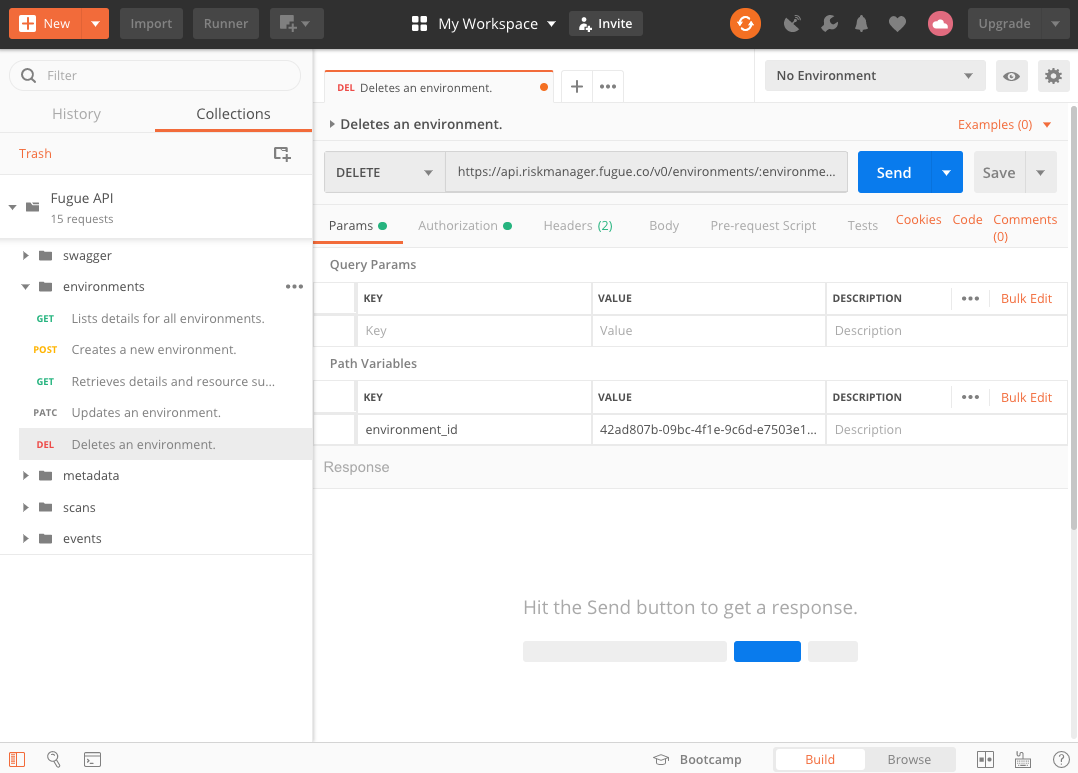
Then, hit the Send button.
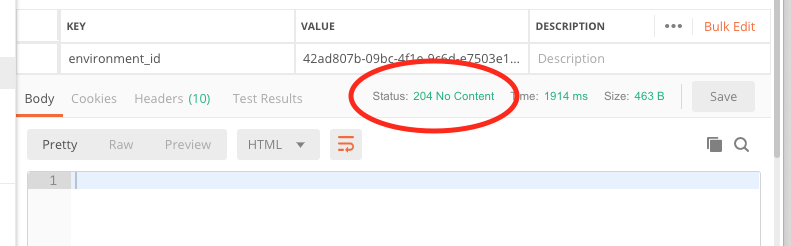
Postman will display the response, which in this case is a
204 No Content status without a body.
No request body was needed in this example, but some requests require them. See Sending a Request Body in Postman to learn how to use them.
Note
If you receive an "Invalid or missing authentication token" message, see the note here.
Sending a Request Body in Postman
Note that if your request requires a body, there’s an extra step to the instructions above. In the Body tab you’ll need to replace the request description with your JSON input. For example, if you’re using PATCH /environments/{environment} to update an environment, your body might look like this:
{
  "compliance_families": [
    "PCI-DSS_v3.2.1", "NIST-800-53_vRev4"
  ],
  "name": "API Test",
  "provider": "aws",
  "provider_options": {
    "aws": {
      "role_arn": "arn:aws:iam::XXXXXXXXXXXX:role/FugueRiskManager"
    }
  },
  "scan_interval": 7200,
  "scan_schedule_enabled": "true",
  "survey_resource_types": [
    "AWS.SNS.Topic", "AWS.SQS.Queue"
  ]
}
Further Reading
You can find an example API request for all of Fugue’s endpoints in API Request Examples.
Want a tutorial about creating an environment? See our walkthrough for curl and Postman.
If you’d like to see the full human-readable API documentation (Swagger spec), visit the API Reference.
To access an interactive version of the Swagger spec, see the Swagger UI.
Or, you can access the Swagger specification file directly here.